
One of the most challenging things that I’ve had to do recently was squeezing an application down into 10k (for the 10K Apart Challenge). When we started working on our 10K Apart app, we quickly realized that we would need a color picker. Our first thought was to check out the new HTML5 color picker. Unfortunately, the only browser that currently supports ‘type=“color”’ is Opera 11.
We also discussed simply giving the user a small group of preset colors, but it just didn’t give us the flexibility that we wanted. At that point, it seemed that the best option was to build our own.
Since I had already been working with the canvas API for other parts of the app, it gave me an idea. Drew and I looked at the standard Photoshop color picker and realized that we could pretty easily recreate the necessary gradients in canvas. And the concept for a canvas color picker was born.
Here’s How We Did It
Start with inserting the canvas tag in your html document:
<canvas class="color-palette" width="284" height="155"></canvas>
Add some JavaScript Magic
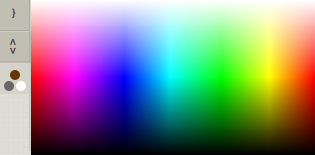
First, we need to cache some references to often needed resources. Second, we will recreate the standard red, magenta, blue, cyan, green, yellow, red gradient on the canvas. We will then add a white to transparent gradient from the top to middle and a transparent to black gradient from the middle to bottom. This gives us all of the colors we’ll need on our canvas. Look familiar, Photoshop lovers?
On line 34 (seen below) comes the addition of a mousedown event handler. Mousedown is used instead of click to allow the color selection to change as the user presses the mouse button and drags. The mousemove event handler tracks the current mouse position and saves it off into a variable in the application object. An interval timer is used to throttle the calls and set the color to a reasonable rate. A mouseup event handler is then added to stop the interval timer and remove the mousemove handler so it isn’t running when the user is not actively clicking in the color picker.
var app = {};
app.$colors  = $('canvas.color-palette');
app.colorctx = app.$colors[0].getContext('2d');
// Build Color palette
app.buildColorPalette = function() {
  var gradient = app.colorctx.createLinearGradient(0, 0, app.$colors.width(), 0);
  // Create color gradient
  gradient.addColorStop(0,    "rgb(255,   0,   0)");
  gradient.addColorStop(0.15, "rgb(255,   0, 255)");
  gradient.addColorStop(0.33, "rgb(0,     0, 255)");
  gradient.addColorStop(0.49, "rgb(0,   255, 255)");
  gradient.addColorStop(0.67, "rgb(0,   255,   0)");
  gradient.addColorStop(0.84, "rgb(255, 255,   0)");
  gradient.addColorStop(1,    "rgb(255,   0,   0)");
  // Apply gradient to canvas
  app.colorctx.fillStyle = gradient;
  app.colorctx.fillRect(0, 0, app.colorctx.canvas.width, app.colorctx.canvas.height);

  // Create semi transparent gradient (white -> trans. -> black)
  gradient = app.colorctx.createLinearGradient(0, 0, 0, app.$colors.height());
  gradient.addColorStop(0,   "rgba(255, 255, 255, 1)");
  gradient.addColorStop(0.5, "rgba(255, 255, 255, 0)");
  gradient.addColorStop(0.5, "rgba(0,     0,   0, 0)");
  gradient.addColorStop(1,   "rgba(0,     0,   0, 1)");
  // Apply gradient to canvas
  app.colorctx.fillStyle = gradient;
  app.colorctx.fillRect(0, 0, app.colorctx.canvas.width, app.colorctx.canvas.height);
  app.$colors.mousedown(function(e) {
    // Track mouse movement on the canvas if the mouse button is down
    $(document).mousemove(function(e) {
      app.colorEventX = e.pageX - ms.$colors.offset().left;
      app.colorEventY = e.pageY - ms.$colors.offset().top;
    });

    // Get the color at the current mouse coordinates
    app.colorTimer = setInterval(app.getColor, 50);
  })
  // On mouseup, clear the interval and unbind the mousemove event,
  // it should only happen if the button is down
  .mouseup(function(e) {
    clearInterval(ms.colorTimer);
    $(document).unbind('mousemove');
  });
};
Pick That Color
The last step is to implement the function that gets called from the interval timer. This simply gets the image data from the canvas at the point of the cursor, converts it into an RGB value, and saves the value to be used however the application needs.
app.getColor = function(e) {
  var newColor;
  imageData = app.colorctx.getImageData(app.colorEventX, app.colorEventY, 1, 1);
  app.selectedColor = 'rgb(' + imageData.data[4] + ', ' + imageData.data[5] + ', ' + imageData.data[6] + ')';
};
And That’s It!
We’ve created a simple, cross-browser color picker in under 50 lines of code. I’ll post back here when our app submission for 10K Apart is ready, but here’s a little sneak peak in the meantime.
Sparkbox’s Development Capabilities Assessment
Struggle to deliver quality software sustainably for the business? Give your development organization research-backed direction on improving practices. Simply answer a few questions to generate a customized, confidential report addressing your challenges.
