
Recently, I was working on a client application that was built using the Vue CLI and the AWS Amplify Framework. One of the requirements for the application was to allow users to sign into Cognito User Pools in different regions. Luckily, the Amplify Framework provides a super simple, pre-built component for setting up authentication with their Amplify UI Authenticator component for Vue.
When using the Authenticator component, we realized that the authenticator is configured from the generated aws-exports.js file with details about a single user pool. Since the Authenticator component didn’t provide an easy way to configure the component for many user pools, figuring out a custom solution was the next step. In this article, I’m going to show you how we configured the authenticator component to work with many user pools.
1. Add the AWS Credentials as Environment Variables
The first step to configuring many user pools is to move your user pools’ configuration details into an .env file. In this example, we’ll have two resources: one in the United States (US) and one in Europe (EU). Create an .env.local file with variables similar to the following:
# First User Pool
VUE_APP_SB_US_RESOURCE_NAME="Sparkbox US"
VUE_APP_SB_US_PROJECT_REGION="XX-XXXX-X"
VUE_APP_SB_US_COGNITO_IDENTITY_POOL_ID="XX-XXXX-X:XXXXXXXX-5555-abcd-95fa-1234567890ab"
VUE_APP_SB_US_COGNITO_REGION="XX-XXXX-X"
VUE_APP_SB_US_COGNITO_USER_POOLS_ID="XX-XXXX-X_abcd1234"
VUE_APP_SB_US_COGNITO_USER_POOLS_WEB_CLIENT_ID="a1b2c3d4e5f6g7h8i9j0k1l2m3"

# Second User Pool
VUE_APP_SB_EU_RESOURCE_NAME="Sparkbox EU"
VUE_APP_SB_EU_PROJECT_REGION="XX-XXXX-X"
VUE_APP_SB_EU_COGNITO_IDENTITY_POOL_ID="XX-XXXX-X:XXXXXXXX-5555-abcd-95fa-1234567890ab"
VUE_APP_SB_EU_COGNITO_REGION="XX-XXXX-X"
VUE_APP_SB_EU_COGNITO_USER_POOLS_ID="XX-XXXX-X_abcd1234"
VUE_APP_SB_EU_COGNITO_USER_POOLS_WEB_CLIENT_ID="a1b2c3d4e5f6g7h8i9j0k1l2m3"
You’ll need to replace the values for the identity and user pool with your own. Since each variable needs to have a unique name, we prefixed each variable with the corresponding resource name and region, for example “SB_US” and “SB_UE”. The VUE_APP_[name/region]_RESOURCE_NAME variable is a custom name to label that grouping of configuration details and will be used later as options for a select dropdown. Feel free to add as many user pools as needed. Adding these variables to different .env files allows you to use different user pools for environments like staging and production.
2. Map .env Variables to the Amplify Configuration Values
Once you have your .env.local variables all set, you’ll need to map those to an array of objects for each resource group to be used when configuring Amplify. Here’s an example of our setup that uses process.env to get the variables from .env.local:
// src/util/AWSResources.js

export const AWSResources = [
  {
    aws_resource_name: process.env.VUE_APP_SB_US_RESOURCE_NAME,
    aws_project_region: process.env.VUE_APP_SB_US_PROJECT_REGION,
    aws_cognito_region: process.env.VUE_APP_SB_US_COGNITO_REGION,
    aws_user_pools_id: process.env.VUE_APP_SB_US_COGNITO_USER_POOLS_ID,
    aws_user_pools_web_client_id: process.env.VUE_APP_SB_US_COGNITO_USER_POOLS_WEB_CLIENT_ID,
    aws_cognito_identity_pool_id: process.env.VUE_APP_SB_US_COGNITO_USER_POOLS_ID,
  },
  {
    aws_resource_name: process.env.VUE_APP_SB_EU_RESOURCE_NAME,
    aws_project_region: process.env.VUE_APP_SB_EU_PROJECT_REGION,
    aws_cognito_region: process.env.VUE_APP_SB_EU_COGNITO_REGION,
    aws_user_pools_id: process.env.VUE_APP_SB_EU_COGNITO_USER_POOLS_ID,
    aws_user_pools_web_client_id: process.env.VUE_APP_SB_EU_COGNITO_USER_POOLS_WEB_CLIENT_ID,
    aws_cognito_identity_pool_id: process.env.VUE_APP_SB_EU_COGNITO_USER_POOLS_ID,
  }
]
3. Create a Select Element with User Pools as Options
Next, we’ll create a select element that will loop through these resources with the v-for directive to build out the options for the select. In our example app, we have the Authenticator component inside of a LoginForm component. This is where we’ll add the user pool select element.
// src/components/LoginForm.vue

<template>
 <div>
   <amplify-authenticator />
 </div>
</template>
First, import the AWSResources file and set it to a data property. We’ve named this “configurations” in our example. We’ll use the configurations to generate the options in the select.
<script>
import AWSResources from '@/util/AWSResources'

export default {
 name: 'LoginForm',
 data: function() {
   return {
     configurations: AWSResources
   }
 }
}
</script>
Next, add a label and a select element above the Authenticator component. Within the select, add an option element that uses the v-for directive to render the list of options as the aws_resource_name. Set the option value as the config object. Then, add a data prop named “selected” and reference it with the v-model directive in the select. This will allow us to get the selected configuration from the value prop and use it later to configure Amplify.
<template>
  <div>
    <label for="user-pool-selector">Choose a User Pool</label>
    <select
     v-model="selected"
     id="user-pool-selector"
    >
       <option v-for="config in configurations" :key="config.aws_resource_name" :value="config">
       {{ config.aws_resource_name }}</option>
    </select>
    <amplify-authenticator />
  </div>
</template>

<script>
import AWSResources from '@/util/AWSResources'

export default {
 name: 'LoginForm',
 data: function() {
   return {
     selected: '',
     configurations: AWSResources
   }
 }
}
</script>
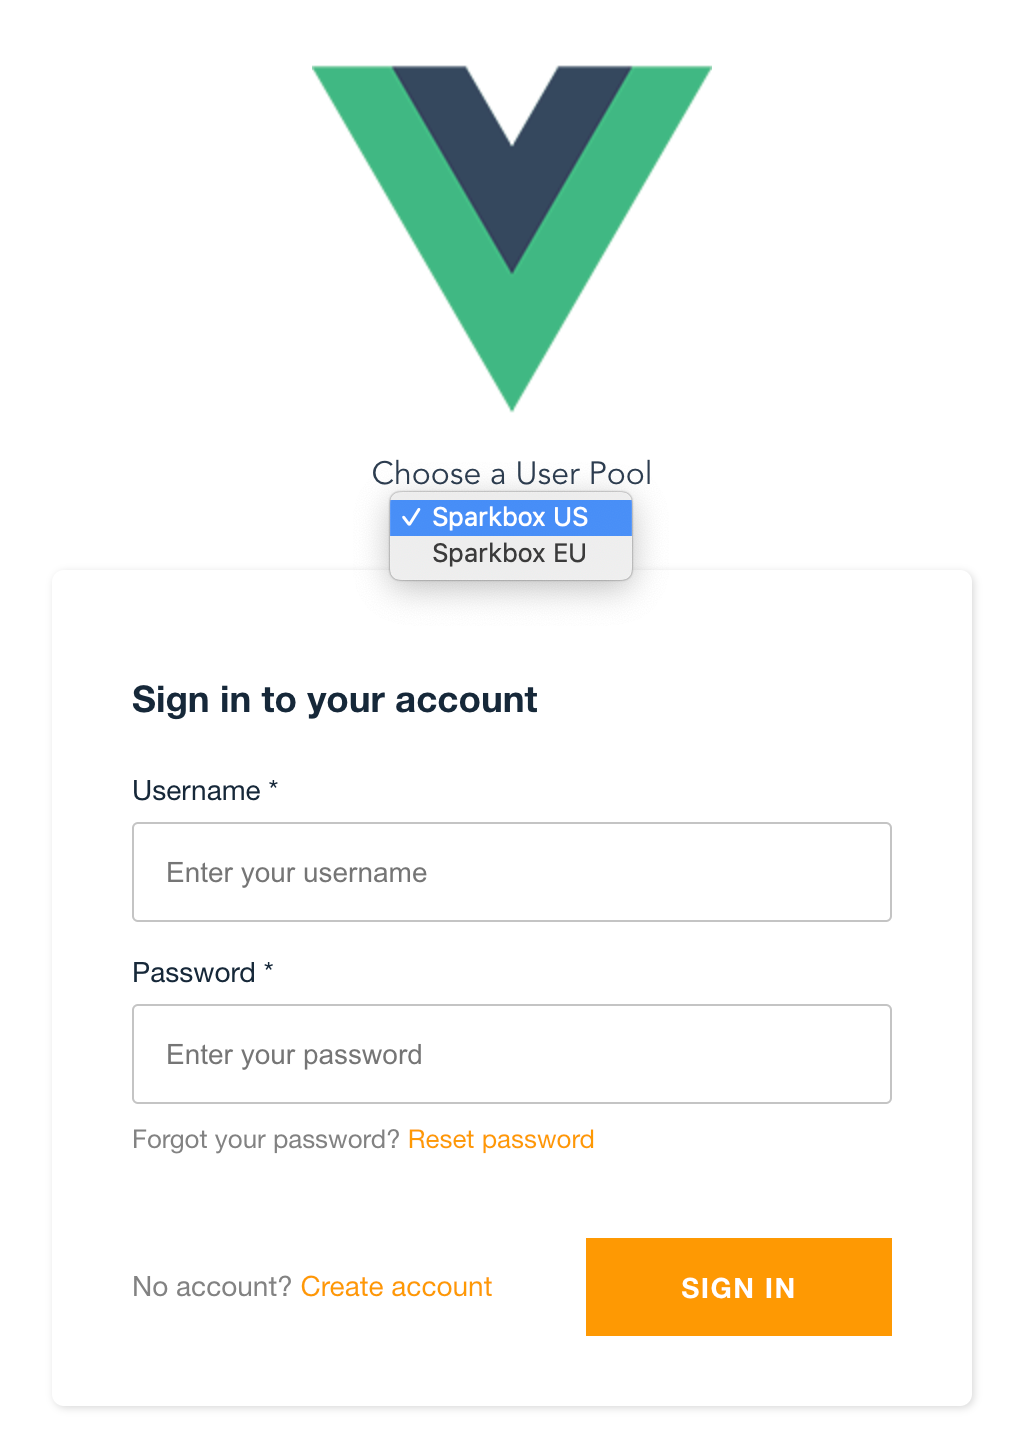
Since the Authenticator component needs to load with a configuration set when it’s created, we’ll set a default configuration. Update the selected data prop to the first object of the AWSResources array or whichever configuration would most commonly be used. As you can see pictured below, the Authenticator component is now configured with the first user pool option.
data: function() {
   return {
     selected: AWSResources[0],
     configurations: AWSResources
   }
}
4. Configure Amplify on created()
Now that we have the selected data prop set to a configuration object, we can run Amplify.configure() from within the created lifecycle hook. To do this, you’ll import Amplify into the LoginForm component. After that, you will add a created() lifecycle hook and call Amplify.configure() using the selected data prop.
// src/components/LoginForm.vue

<script>
import AWSResources from '@/util/AWSResources'
import Amplify from 'aws-amplify'

export default {
 name: 'LoginForm',
 data: function() {
   return {
     selected: AWSResources[0],
     configurations: AWSResources,
   }
 },
 created () {
   Amplify.configure(this.selected)
 }
}
</script>
5. Reconfigure the Authenticator with the Select Change Event
Each time a user chooses a user pool from the select, you’ll need to reconfigure the Authenticator component with the updated configuration details. We’ll do this by binding a reconfigure method to the change event on the select.
<select
  v-model="selected"
  id="user-pool-selector"
  class="cmp-aws-config__select"
  @change="reconfigure"
>
  <option v-for="config in configurations" :key="config.aws_resource_name" :value="config">
       {{ config.aws_resource_name }}</option>
</select>
The reconfigure method will run Amplify.config() again with the newly selected configuration object.
methods: {
   reconfigure () {
     Amplify.configure(this.selected)
   }
}
6. Force a Re-Render of the Authenticator Component
The last thing you must do to get this all working properly is to set a key on the Amplify Authenticator component so that it forces a re-render. The Authenticator will need to re-render when the new configuration object is selected. Add a key to the authenticator component that’s set to the selected resource name with selected.aws_resource_name. Any time an option is chosen in the select, the authenticator will re-render with the corresponding configuration.
<amplify-authenticator :key="selected.aws_resource_name" />
Your authenticator component should now be set up to allow logging in to each user pool. Start up your application and try this out by logging in with a Cognito user.
Wrap Up
While the UI Authenticator component makes it quick to get going with authentication, it requires some customization when you need to support many user pools. If this was also a problem you encountered, I hope this walkthrough gives you a solution until this is a supported feature in the future.
Sparkbox’s Development Capabilities Assessment
Struggle to deliver quality software sustainably for the business? Give your development organization research-backed direction on improving practices. Simply answer a few questions to generate a customized, confidential report addressing your challenges.
