
Unit testing is like taking out the trash or doing the dishes—at least that’s how I used to feel. I thought of it as more of a chore than other work, like developing features, pairing, and problem solving.
I didn’t truly understand why unit testing was so important, and I wasn’t confident in where to even start if I was handed a blank spec file and told to start writing tests. So I decided to focus on improving my testing skills. And, tale as old as time, I fell in love...with unit testing. That’s because I learned the value of testing through writing lots and lots of unit tests. Unit tests are great because
They help you find bugs in your code
They help you understand your code better
They increase your confidence in the code you are shipping
They offer you immediate feedback
In this article, I’ll share the steps I used to become more confident with writing unit tests. Hopefully, they will help you feel more self-assured with testing and show you how fun it can be to work on unit tests!
I’m going to dive into some details of working with a testing suite, specifically Mocha and Chai. Also, I’ll be testing a function associated with an accordion. If you are interested in how to build an accordion check out my video series. I’m going to assume that you are already familiar with what unit testing is. If you need a refresher, check out this article.
Outline
Outlining is the mantra of all writers. And, as a developer with a non-traditional background and an English degree, I like to think that the 3 years of outlining papers for English writing classes prepared me for writing unit tests. When writing an essay, you organize your main points in an outline so it’s easier to write the paper. Outlining unit tests can provide the same benefit for writing your tests.
When it comes to unit testing, the biggest barrier to entry is often where to start. It can be overwhelming when you aren’t comfortable with writing tests. You have to create a new file and start testing functionality that has already been developed. In an ideal world, we might be implementing test driven development, but sometimes we end up writing tests after the fact for a variety of reasons.
We are going to be writing tests for a function that has already been written and is being used on our site.
First, import anything you need to start testing. At this point you’re no longer working with a completely blank file! Sometimes the hardest part is starting, and we’ve already done that.
 import { expect } from 'chai';
 import { toggleButton} from '../js/multi-select-accordion/helpers';
Then write your first
describeanditstatement. It’s always good to focus on outlining “describe” and/or “it” blocks. Having to fill in the description for them helps you think about the exact behavior you are going to be testing. Let’s take a look at thetoggleButtonfunction we imported so we can figure out what we need to test first.
function toggleButton(button) {
  const expandedValue = button.getAttribute('aria-expanded');
  const setValue = expandedValue === 'true' ? 'false' : 'true';
  button.setAttribute('aria-expanded', setValue);
}
This function takes in a parameter called button, gets the value of that element’s aria-expanded attribute, and sets it to the opposite value. So let’s write a description for testing what the ‘toggleButton’ function will do when the element’s original aria-expanded attribute is set to false.
describe('Accordion', () => {
  describe('toggleButton', () => {
    it('sets aria-expanded to false, when initially set to true', () => {
    })
  })
})
Now outline the test body with the AAA method, or Arranging, Acting, and Asserting. When we use the AAA method, we want to arrange any mock data or variables, then act or initialize a function with the mocked data. Then we write our
expectstatement or assert what happened based on the function’s behavior.
Outlining with comments also gives you a great place to start. Now there are no expectations to jump into our assertion right away. You know you need to arrange your code first, then act on it, and then you can figure out what you need to assert or what the structure of your expect statement should be.
describe('Accordion', () => {
  describe('toggleButton', () => {
    it('sets aria-expanded to false, when initially set to true', () => {
    // Arrange
    // Act
    // Assert
    })
  })
})
Outlining is a small step towards writing tests, but it’s a powerful one. It can also help you think about what you’re planning to test and if that’s even a valuable test to write.
Mock
Mocking or imitating data and components is my favorite part of writing unit tests because it reminds me of the versatility of a potato. Yes, a potato. When we mock data, it’s like figuring out what form of potato we want: chips, fries, mashed, baked, etc. All of these things are still potatoes, they are just in different forms and usually come with different condiments. Similarly, when it comes to mocking, as long as the data we are mocking out is still the same type of data, the content can be anything we want.
When testing the behavior of a functionality, I don’t care about the exact input and output as much as I care about how the function handles those values. So mocked data can have any value as long as the type of data my function is expecting is the same.
A Fake DOM
We want to mock out variables we pass to our function in the ‘Arrange’ section. But before we can do that for these tests, we have to mock out our DOM dependency in a beforeEach hook because we know we will need it to get those variables. We definitely still could mock out the DOM in the ‘Arrange’ part of every test, but that’s going to make the test file difficult to read. Generally, if you find yourself repeating code for each test in the ‘Arrange’ section, it’s probably good practice to add that code to a beforeEach hook.
Thankfully, there are tools like jsdom to help us create a fake DOM in a few easy steps. After installing jsdom to our project, I’m going to import it, import { JSDOM } from ‘jsdom’;, into the test file. Then I can set up the mocked DOM. Normally we would want to start off by mocking out everything in the ‘Arrange’ section of our tests, but since I know we will need to use the DOM for each of our tests we are going to use a beforeEach hook, one of my best friends when it comes to testing.
The beforeEach hook runs before every single it block inside the describe block it resides in. So if we set up our fake DOM in a beforeEach hook, it will run before each test.
beforeEach(() => {
  const dom = new JSDOM(
    `<html>
       <body>
       </body>
     </html>`,
     { url: 'http://localhost' },
  );

  global.window = dom.window;
  global.document = dom.window.document;
});
We have a fake DOM now! Next, we need to add an element between the body tags of our jsdom instance because our ‘toggleButton’ function needs an HTML element as an argument. When we initialize the ‘toggleButton’ function in our test, we will need to grab an element from this fake DOM and pass it to the function.
I’m going to add the following code to our jsdom:
<button class="tater-tots" aria-expanded="true">Tots</button>
Arrange and Act
We already completed part of the ‘Arrange’ step by setting up jsdom, but now we need to pull in the variable we plan to use in our ‘Act’ section. We can do that just like we would normally grab an element from the DOM. Let’s jump back to the test we previously outlined and use querySelector to pull in the button we just made.
describe('Accordion', () => {
  describe('toggleButton', () => {
    it('sets aria-expanded to false, when initially set to true', () => {
      // Arrange
      const taterTotsButton = document.querySelector(‘.tater-tots);
      // Act
      // Assert
    })
  })
})
Now that we pulled in the button variable, we can act, or call the function we want to test. Since that toggleButton function is expecting a button element we can pass in our taterTotsButton as a parameter. When this function runs in our tests, it will update the jsdom, and we will be able to assert that a certain behavior, or outcome, will occur.
describe('Accordion', () => {
  describe('toggleButton', () => {
    it('sets aria-expanded to false, when initially set to true', () => {
      // Arrange
      const taterTotsButton = document.querySelector('.tater-tots');
      // Act
      toggleButton(taterTotsButton);
      // Assert
    })
  })
})
We finished mocking out everything to make this test run. The only step left is to write our expect statement. I know that the toggleButton function changes the value of the aria-expanded attribute, so I want to store that in a variable. This step isn’t necessary. I could easily write out the expect statement like this: expect(taterTotsButton.getAttribute(‘aria-expanded’)).to.equal(‘false’); But I think it’s easier to read if we separate the argument we are passing to the expect method into a variable. When we do that, the finished product of the test will look like this:
describe('Accordion', () => {
  describe('toggleButton', () => {
    it('sets aria-expanded to false, when initially set to true', () => {
      // Arrange
      const taterTotsButton = document.querySelector('.tater-tots');
      // Act
      toggleButton(taterTotsButton);
      // Assert
      const taterTotsAria = taterTotsButton.getAttribute('aria-expanded');
      expect(taterTotsAria).to.equal('false');
    })
  })
})
For this example I mocked out a DOM and an HTML element. You could also mock out an object or a simple variable if that’s what your function needs as a parameter.
After mocking that out, I used our outlined comments to set up everything we needed in order to write the ‘expect’ statement. In the ‘Arrange’ section, I assigned an element from our instance of jsdom to a variable we could use as a parameter. Then in the ‘Act’ section, I called our function and passed that variable as a parameter. Finally, in the ‘Assert’ section, I told the test to expect the aria-expanded value to be false.
Break Things
We usually aren’t supposed to break our code. But when it comes to unit testing, we want to break things. We want to take a sledge hammer to our function to see what happens when it breaks. Does any unexpected behavior show up?
When I get to the point where I’ve written all of the baseline unit tests and I need to start breaking stuff, I just think about all of the “What ifs”. “What if the element we passed to toggleButton didn’t already have an aria-expanded? What would happen?” Well we can find out with unit tests. Let’s write one for this “What if.”
describe('Accordion', () => {
  describe('toggleButton', () => {
    beforeEach(() => {
      const dom = new JSDOM(
      `<html>
       <body>
         <button class="tater-tots" aria-expanded="true">Tots</button>
         <button class="couch-potato">Potato Potating</button>
       </body>
     </html>`,
     { url: 'http://localhost' },
    );

    global.window = dom.window;
    global.document = dom.window.document;
  });

  it('does something when the element does not have aria-expanded', () => {
    // Arrange
    const potatoButton = document.querySelector('.couch-potato');
    // Act
    toggleButton(potatoButton);
    // Assert
    const potatoAria = potatoButton.getAttribute('aria-expanded');
    expect(potatoAria).to.equal('');
    })
  })
})
I don’t really know what’s going to happen, but that’s okay because Mocha usually gives us helpful errors.
After running the test script, the error AssertionError: expected ‘true’ to equal ‘‘ showed up. That’s really interesting. That means that even though the button didn’t originally have an aria-expanded attribute, the toggleButton function is adding one with the value of true.
The next step is to figure out what we want to do with this new information. Should there be a check and some error handling when passing in an element that doesn’t have an aria-expanded attribute to begin with? Is this ‘bug’ actually a nice feature to have? Breaking things with tests can bring some great questions about the core functionality of your app to light, so I’d suggest you start breaking things!
Eliminate the Guesswork
One thing I ask myself when writing tests, is “What should I be testing?” As you continue to write tests, you’ll get more comfortable with answering that question and deciding what the most valuable tests will be. But even then, we can’t process all of the testable pieces of our code as well as a program can.
Test Coverage
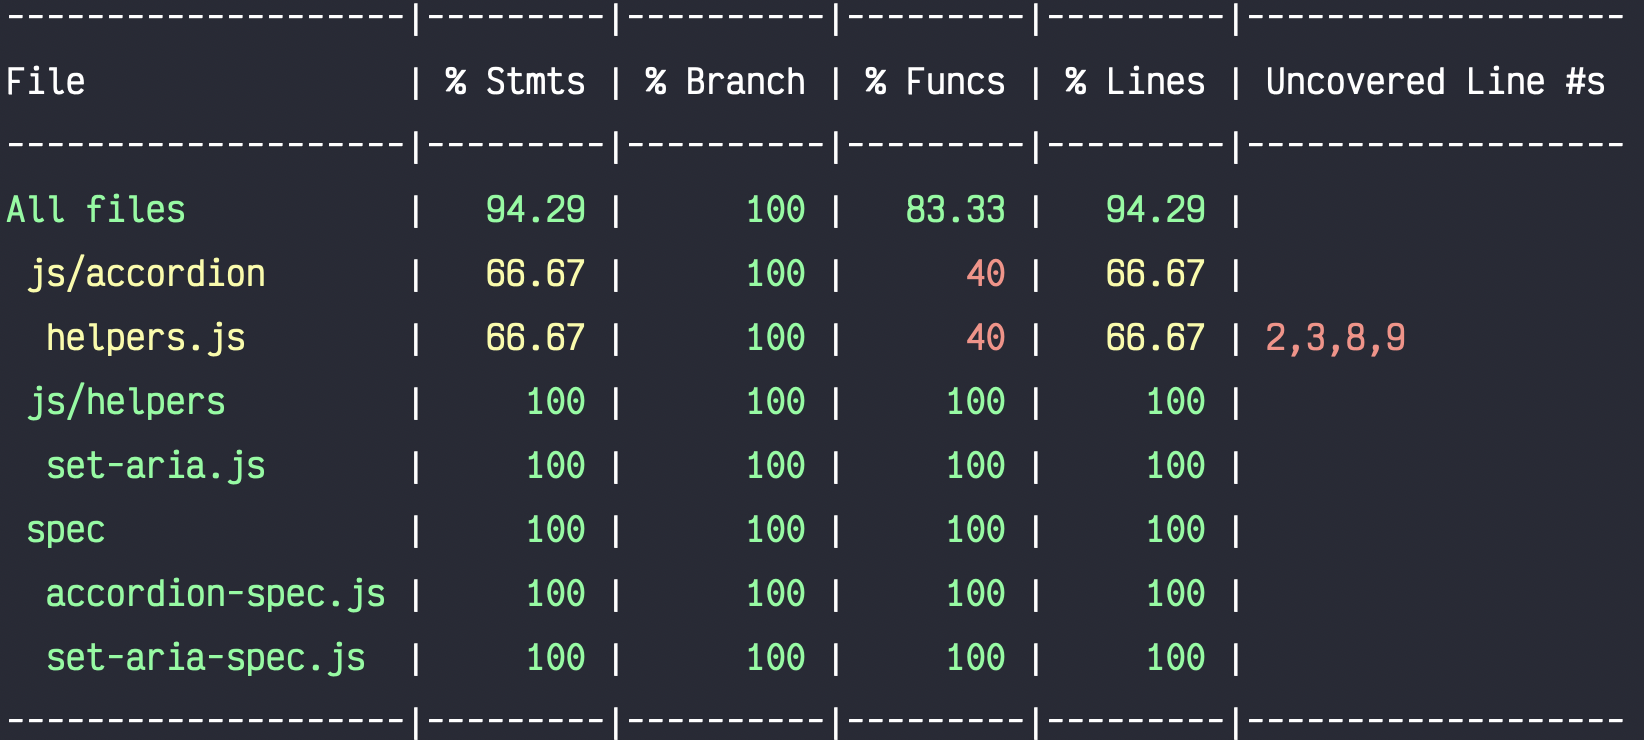
That’s why I like to use nyc, or Istanbul’s command line interface, with projects. nyc will read through all of your files and all of your test files, do some magic, and compare them to generate a small test coverage report for each file. It will even let you know which lines for each file still need tests written around them.
To set it up, install nyc to your project and then add nyc --reporter=text to your test script. So my test script looked like this after adding the nyc reporter:
"test": "nyc --reporter=text mocha --require @babel/register './src/**/*spec.js'"
This is a great way to feel confident in your test coverage. You can also practice writing more tests when the report shows you all of the lines that still need tests written around them.
Below you can see the nyc output after running my tests. It shows that there are still a few uncovered lines in the accordion/helpers.js file. Before running the report, I had no idea I could use more tests for this file, so this data is really helpful.
Writing unit tests doesn’t have to be a chore. It can be rewarding, valuable, and even fun! For me, the first step to realizing this was getting comfortable with being uncomfortable. I wasn’t used to writing unit tests, and I had to be okay with that in order to get better, improve my skills and become more confident in it. It will take practice, but hopefully this article will help you get started.
If you’d like to look at everything put together, check out this repository.
Sparkbox’s Development Capabilities Assessment
Struggle to deliver quality software sustainably for the business? Give your development organization research-backed direction on improving practices. Simply answer a few questions to generate a customized, confidential report addressing your challenges.
