
In the previous entry in this series, we finished adding support for JavaScript and TypeScript, including linting, testing, and legacy builds for older browsers. This time, we’ll set up our starter template so that it has Progressive Web Application (PWA) support.
If you just want to see the code (or use the starter template), you can find the repo at https://github.com/dustin-jw/eleventy-starter. You can also see a snapshot of what the codebase looks like after following the steps in this article by going to the PWA branch.
Wait, What’s a PWA?
For a website to be considered a Progressive Web Application, it needs to support a number of features designed to give users experiences similar to those found on native applications. The goal is for the website to be responsively designed, progressively enhanced, secure, installable, and resilient to network outages, among other things.
PWAs achieve this primarily through the use of service workers and web manifests, but they also use other common web features that would be used on typical sites, such as favicons and meta tags.
Our site will be a PWA that can be installed to a user’s home screen or desktop, and we will be able to provide some offline experiences by caching pages and assets as users access them.
PWA Checklist
Before we get started, let’s put together a list of what we need to do to make our starter template a PWA. We’ll be using Lighthouse to audit the site and we’ll use its recommendations to build up PWA support. We’ll start by running an audit in Chrome’s DevTools under the Lighthouse tab.
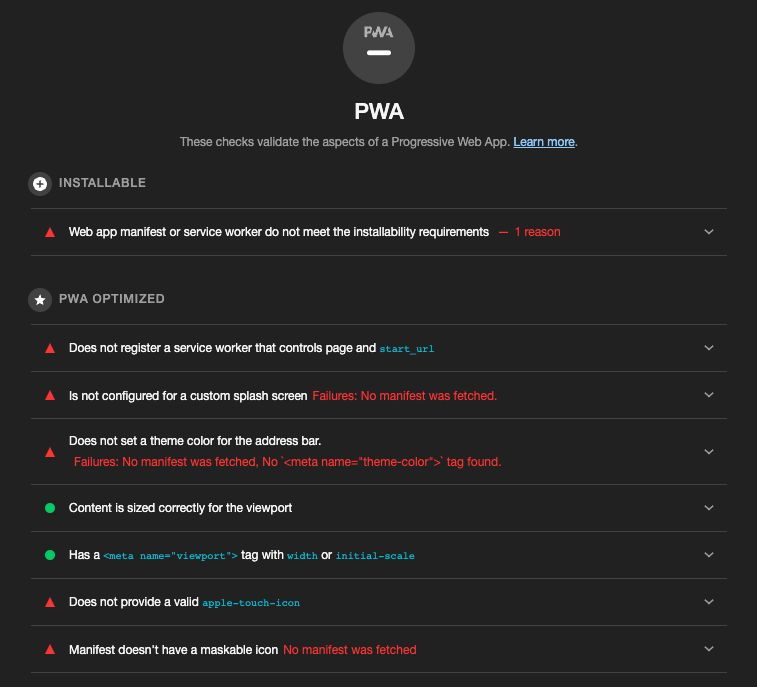
We have quite a few failures in that audit, so let’s organize them in a checklist and then fix them one by one.
Add a
robots.txtfile (technically an SEO thing, but we might as well add one)Add missing icons
favicon.svgand/orfavicon.pngapple-touch-iconMaskable icon
Splash screen icon
Add a web app manifest (
manifest.json)Add a service worker
Adding a robots.txt File
We’re going to have a few static assets that we want served from the top-level directory of our deployed site, so let’s add a new folder to our src directory, called public. In src/public let’s add an empty robots.txt file, which will make our site a little more searchable. If you want to disallow certain bots or block pages from being indexed, feel free to do so following robots.txt conventions. But be warned: bad actors can ignore robots.txt, so don’t use it with the intent of hiding sensitive information.
The src/public folder currently doesn’t mean anything to Eleventy or any of our other tooling, so it will be ignored when we run npm start or npm run build. Let’s change that by telling Eleventy to copy the contents of src/public, as-is, to our published site’s top-level directory. We can specify those folders in .eleventy.js using the addPassthroughCopy function.
// .eleventy.js
module.exports = function (eleventyConfig) {
  eleventyConfig.addWatchTarget('./src/scss/');
  eleventyConfig.addWatchTarget('./src/js/');

  eleventyConfig.addPassthroughCopy({ 'src/public': '/' });

  return {
    dir: {
      input: 'src/pages',
      output: 'dist',
      includes: '../partials',
    },
  };
};
After running npm run build, we should now see our robots.txt file in the dist folder. With that in place, we can start adding our other static assets.
Adding Required Icons
So far with this starter template, we’ve gone with a set-it-and-forget-it approach as much as possible. Unfortunately, that approach won’t work so well with icons—they’re most likely going to need to be replaced for each new project. With that in mind, we’ll try to minimize the amount of icons that need to be replaced when starting a new project.
To generate the icons, I created a tiny SVG icon (favicon.svg), then converted that SVG to PNGs at different sizes (16x16 for favicon.png, 196x196 for the maskable_icon.png, and 512x512 for splash_icon.png).
<!-- favicon.svg -->
<svg width="16" height="16" xmlns="http://www.w3.org/2000/svg">
  <circle cx="8" cy="8" r="8" fill="rebeccapurple"/>
</svg>
An equally valid approach would be to make one large image, then resize it down to those same dimensions. There are a variety of tools that can help for icon generation and the project’s README includes the list of icons to replace, which is about as painless as this part can be for a starter template.
After creating the icons, I added them to src/public so they would be copied along with the robots.txt file whenever we build the site.
Now that we have icons available, let’s update our layout partial (src/partials/layout.njk) to reference those icons. These will go in the head along with the other link and meta tags that are already there.
<link rel="icon" href="/favicon.svg" type="image/svg+xml" />
<link rel="alternate icon" href="/favicon.png" type="image/png" />
<link rel="mask-icon" href="/favicon.svg" />

<link rel="apple-touch-icon" href="/maskable_icon.png" />
The first three link tags will cover our favicon needs. If browsers support SVG favicons, they will use the first one. Otherwise, they’ll fall back to the PNG icon. Safari does its own thing, so we provide the mask-icon that will be used for pinned tabs. The apple-touch-icon will be used as the icon on Apple device home screens if the site is installed as a PWA.
We need a few more things in place before users will be able to install the site, though. Next up, we need a web manifest.
Adding a Web Manifest
A web manifest provides metadata that browsers can use to determine whether a site can be installed as a PWA. We’ll create a manifest.json file in src/public and fill in the minimal amount of fields needed to meet installation requirements.
{
  "short_name": "Eleventy Starter",
  "name": "Eleventy Starter",
  "description": "A starter template for creating websites using Eleventy.",
  "icons": [
    {
      "src": "favicon.svg",
      "type": "image/svg+xml",
      "sizes": "192x192 512x512"
    },
    {
      "src": "splash_icon.png",
      "type": "image/png",
      "sizes": "512x512"
    },
    {
      "src": "maskable_icon.png",
      "type": "image/png",
      "sizes": "196x196",
      "purpose": "any maskable"
    }
  ],
  "start_url": "/",
  "scope": "/",
  "background_color": "#f8f8f8",
  "theme_color": "#f8f8f8",
  "display": "standalone"
}
The name, short_name, and description fields may be shown to users, depending on context, such as in link previews or as the label under the icon on a home screen, if installed. The icons let the user’s device know what to use for the favicon, home screen or desktop icon, and splash screen icon.
The start_url specifies which page the user should navigate to when opening your PWA. In our case, that’s the home page. The scope specifies which pages are allowed to be treated as part of the PWA. If a user navigates outside of that scope then they are taken to a normal browser tab or window. In our case, anything within our site would be covered, but if a user clicked a link to a different site they would be taken out of our application’s context.
The background_color sets a placeholder background color that should take effect before any stylesheets are loaded. The theme_color differs depending on browser and OS but normally it affects details like the status bar on a phone, for example.
The display field specifies how the application should look on the user’s device. We’re using standalone, which will make it behave like a native application, but the other options are fullscreen, minimal-ui, and browser.
If you want to know more about web manifests, or want to set different fields that we didn’t cover here, MDN’s documentation goes into much more depth.
The last thing we need to do with our web manifest is reference it in our layout partial. We’ll also set a theme color in a meta tag.
<link rel="icon" href="/favicon.svg" type="image/svg+xml" />
<link rel="alternate icon" href="/favicon.png" type="image/png" />
<link rel="mask-icon" href="/favicon.svg" />

<link rel="apple-touch-icon" href="/maskable_icon.png" />

<link rel="manifest" href="/manifest.json" />
<meta name="theme-color" content="#f8f8f8" />
We’ve checked nearly all the boxes that we need to be PWA-ready, but we’re missing one critical piece–a service worker.
Adding a Service Worker
In case you are unfamiliar, service workers are powerful tools that enable all sorts of cool features for websites, including push notifications, background sync, advanced caching techniques, and offline support.
We won’t be getting too advanced with ours, though. We just need something that’s broadly useful, regardless of the type of site we’re building. We’ll set up our service worker to pre-cache certain URLs and assets, then handle everything else with a cache-falling-back-to-network strategy, meaning that whenever the browser requests something our service worker will check the cache first, and if it doesn’t find it, will download the thing via the network. Anything that it does find (with some exceptions) will be added to the cache and speed up subsequent requests for the same image, stylesheet, script, document, or whatever.
Let’s create a file in src/public called service-worker.js. To start, we’ll add some helpful constants that we’ll use later on.
const VERSION = 1;

const CACHE_KEYS = {
  PRE_CACHE: `precache-${VERSION}`,
  RUNTIME: `runtime-${VERSION}`,
};

// add any urls that you don't want to be cached
const EXCLUDED_URLS = [];

// add any urls that you want cached when the service worker is installed
const PRE_CACHE_URLS = [
  '/',
  '/styles.css',
];

// add any hosts that you want to bypass
const IGNORED_HOSTS = [
  'localhost',
];
We’ll have two CACHE_KEYS to manage assets that should be treated differently. Anything that we specifically want to cache when the user visits the site for the first time should go into the PRE_CACHE cache and anything that gets picked up as the user browses the site will go into the RUNTIME cache. We’re using a version number to make the values distinct. That will be important when we update the site and want the old assets and URLs to be deleted from the cache.
If there are any urls that we never want to cache, we can put those in our EXCLUDED_URLS array. For things we want cached right away, we’ll use the PRE_CACHE_URLS array. These should be high-priority items—in our case, we’re caching the home page and the stylesheet that’s used on every page.
Development involves frequent changes to files, so we don’t want our service worker to be caching everything when our site is running on localhost. If you want to disable the service worker in any other environments you can add those to the IGNORED_HOSTS array as well.
Next, we’ll set up our installation and activation event handlers. These events are both part of the service worker lifecycle, but we’ll use them slightly differently. On installation, we want to cache our PRE_CACHE_URLS and on activation we want to delete any outdated assets or URLs from the cache.
const addItemsToCache = (cacheName, items = []) => {
  caches.open(cacheName).then((cache) => cache.addAll(items));
};

self.addEventListener('install', () => {
  self.skipWaiting();

  addItemsToCache(CACHE_KEYS.PRE_CACHE, PRE_CACHE_URLS);
});

self.addEventListener('activate', (event) => {
  event.waitUntil(
    caches
      .keys()
      .then((cacheNames) => cacheNames.filter((item) => !Object.values(CACHE_KEYS).includes(item)))
      .then((itemsToDelete) => Promise.all(itemsToDelete.map((item) => caches.delete(item))))
      .then(() => self.clients.claim()),
  );
});
We have a helper function called addItemsToCache, which will put whatever items we give to it into whichever cache we specify. In the case of installation, we put our PRE_CACHE_URLs (/ and /styles.css) into the precache-1 cache.
In our activation handler, we get all the existing cache keys then check to see whether those are defined in our CACHE_KEYS object and if they aren’t we delete the items in those caches. This is where the versioning becomes important. Say we had released this with VERSION = 1, but then we decided to change some styles. For our next release, we update to VERSION = 2, which changes our CACHE_KEYS to be precache-2 and runtime-2. Anything that was cached under precache-1 or runtime-1 will be deleted once the new service worker is activated. This is how we can clean up after ourselves when we release changes and prevent issues where users are served stale content.
Now that installation and activation handlers are set up, we can shift our focus to fetch events, which will populate our runtime cache.
self.addEventListener('fetch', (event) => {
  const { hostname } = new URL(event.request.url);

  // if it's an ignored host, do nothing
  if (IGNORED_HOSTS.indexOf(hostname) >= 0) {
    return;
  }

  // if it's an excluded url, do nothing
  if (EXCLUDED_URLS.some((page) => event.request.url.indexOf(page) > -1)) {
    return;
  }

  // return from cache, falling back to network
  event.respondWith(
    caches.match(event.request).then((cachedResponse) => {
      if (cachedResponse) {
        return cachedResponse;
      }

      return caches.open(CACHE_KEYS.RUNTIME).then((cache) => (
        fetch(event.request)
          .then((response) => (
            cache.put(event.request, response.clone()).then(() => response)
          ))
      ));
    }),
  );
});
We have some logic at the start to let us ignore any hosts or URLs that we don’t want to cache, and then we have our cache-falling-back-to-network strategy to handle everything else.
When a request is made, the service worker will check the cache for anything matching that request. If it finds a match it will return that data and avoid making a network request. If it doesn’t find a match it will try the network, make a copy of the response to put in the runtime cache, and return the response to the browser.
Using Eleventy to Make Versioning Easier
There’s one element of this service worker that will be a real maintenance headache:
const VERSION = 1;
We’ll need to update this version number any time that we deploy our site, which would require a code change the way things are now. It would be easy to forget this step, and the consequences of having users using a mixture of cached, outdated assets, and new content could be page-breaking. So let’s leverage some of Eleventy’s built-in features to make it so we never have to remember to update this value.
Eleventy allows for global data files to define content to be available at build time. These can be JSON files with static data or they can be JavaScript files that can execute or export functions. We’ll use this feature to generate a random string that we use as our version number. Let’s add a file called global.js to src/pages/_data.
module.exports = {
  // generate a random string for service worker versioning, such as "36f4-1234-8c7a"
  random() {
    // eslint-disable-next-line no-bitwise
    const segment = () => (((1 + Math.random()) * 0x10000) | 0).toString(16).substring(1);

    return `${segment()}-${segment()}-${segment()}`;
  },
};
The random function that we’re exporting will generate a random string. We’re using a technique that generates 4 digit hexadecimal strings and arranges them into segments, which decreases the odds of the same string being generated twice. We could probably just use Math.random() and be fine for this use-case, though. Either way, we now have a way of generating something random that we can use as our version number.
Up to this point, we’ve been using .njk files to create HTML files. However, by using permalinks, we can actually use .njk files to generate any other kind of file that we want, including JavaScript. Similarly, we’ve only put HTML partials in our partials folder, but we can include JavaScript files as well. Let’s take advantage of this flexibility to make our service worker a little more dynamic.
Let’s move our service-worker.js file from src/public to src/partials and create a new file called service-worker.njk in src/pages.
---
permalink: '/service-worker.js'
---
const VERSION = '{{ global.random() }}';
{% include "service-worker.js" %}
We’re setting the permalink to /service-worker.js, which is where our site is already looking for the service worker. Our random function is available in this template thanks to global data files, so we’re using it to set the VERSION that previously was hard-coded to 1. In src/partials/service-worker.js, we’ll need to delete const VERSION = 1; since that’s being declared elsewhere and we may need to update some ESLint rules. Here are what the first few lines of that file should look like now.
/* global VERSION */
/* eslint-disable no-restricted-globals */
/* eslint-env serviceworker */

const CACHE_KEYS = {
  PRE_CACHE: `precache-${VERSION}`,
  RUNTIME: `runtime-${VERSION}`,
};
Now, whenever we build our site the service worker will be built using a different version number and we won’t have to remember to update anything when we deploy our site.
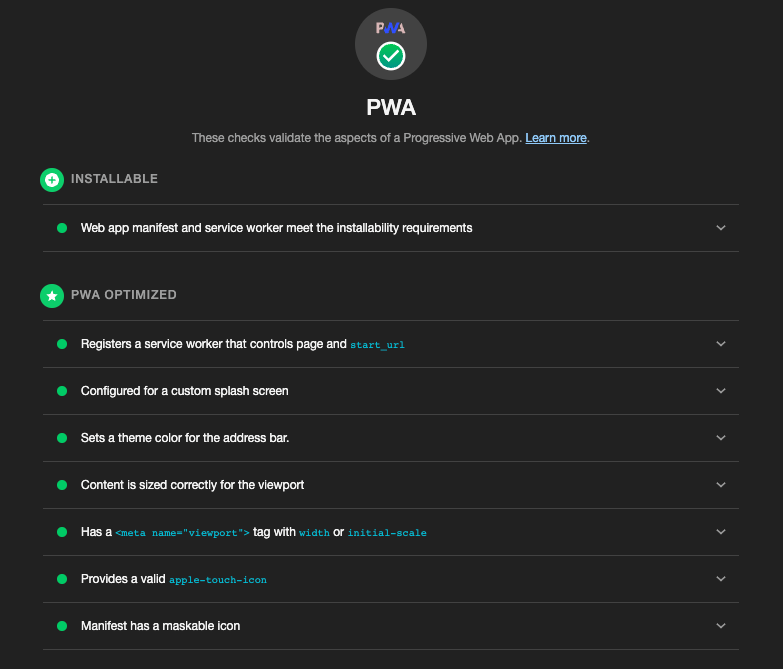
Checking Lighthouse for PWA Readiness
We should be PWA-ready now! If we run another Lighthouse audit against our site, we should see something like this.
What Next?
Our starter template is looking really good now. Just running through the checklist, we have:
Solid project architecture
Strong HTML foundations, including linting for accessibility
CSS/SCSS support, including linting
JavaScript and TypeScript support for both modern and legacy browsers, including linting and testing
Basic installation requirements met to make our site a Progressive Web App
With all of that in place, we’ll finish the series by shifting focus to our development workflow. Join us next time when we cover build pipelines, dependency management, and collaboration.
